The toolbar provides easy access to key functions of the CatDV Web Client.
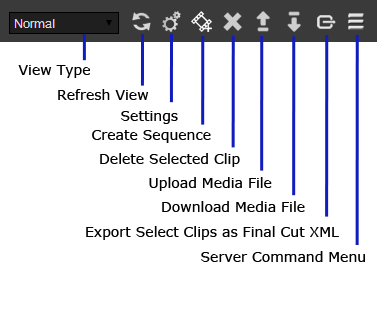
The functions available are:
- View Type – select the format of the main clip list view. There are essentially two types of view – the list view and the grid view, each of which has a number of variants that show different columns (for the list view) or different sized thumbnails for the grid views.
- Refresh View – this reloads the whole Web Client view including the navigation tree.
- Settings – opens the settings dialog (see below)
- Create Sequence – create a new sequence from the selected clips (see the Sequence section)
- Delete Selected Clip – permanently deletes the clip from the catalog
- Upload/Download Media File – allows you to upload or download media file to/from the server (see below)
- Export Selection as Final Cut Pro XML – builds a FCP XML file based on the selected clips and allows you to save it locally
- Server Command Menu – if your system implements optional server commands then they will appear here.
Settings
The CatDV Web Client supports a small number of user-preferences that are stored in your browser. You can set these by clicking the settings button in the toolbar, which will launch the settings dialog:
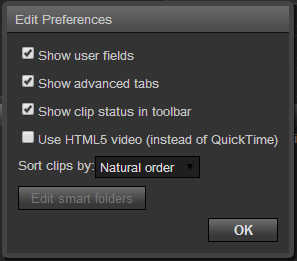
The settings mostly concern which of the standard details tabs should be displayed. You can also choose which media player you wish to use and the default clip sort order.
The settings dialog also gives access to the Smart Folder dialog.
Managing Smart Folders
Clicking the Edit Smart Folders button brings up the Smart Folder dialog that lets you create and edit Smart Folders. A Smart Folder is a folder whose contents are defined by the results of running a query. Defining a new Smart Folder is exactly the same as creating an Advanced Search Query and is described in the Advanced Search section.
Smart folders can be defined by an administrator using the CatDV Pro client application (by right clicking on the “Shared smart folder” node) or from within the Web Client by clicking on the Settings tool bar button. Use the client application if the slightly simpler interface provided by the web client doesn’t provide access to all the fields you require. Smart folders are given a name and are organized by production group for the benefit of users who are members of more than one group. You can also arrange them in your own subfolders by separating components of the name with a ‘/’ character.
Media Upload/Download
Clicking the Upload Media button will bring up the Upload Media File window:
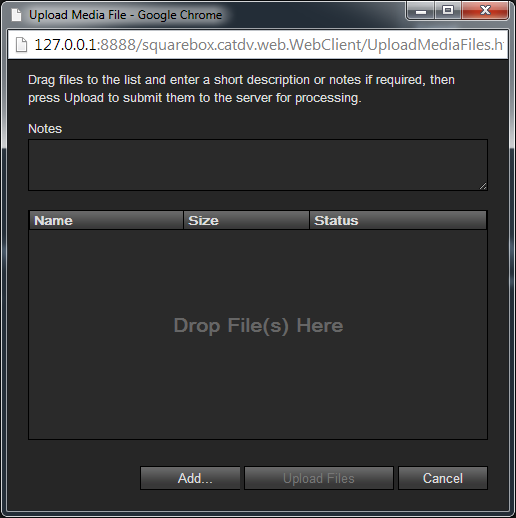
Here you can assemble a list of media files to be uploaded to the server by either dragging them to the list (where the Drop Files(s) Here message is) or by clicking the Add… button and selecting them from the file system. Once you have selected the files you wish to upload click the Upload Files button and they will be sent to the server and saved into the folder configured on the server for uploads. Typically a CatDV Worker task would subsequently process these files and load them into the CatDV database.
You can also download the media file associated with a clip by clicking the download media button in the toolbar. You will asked where you would like the file saved.